Configuration 🌟
Categories:
At the heart of SWS is a single PeopleSoft Service Operation called CHG_SWS_GET. This single service operation can serve infinite use cases. A PeopleSoft super-user who has read this documentation configures SWS to create new web services using a configuration page delivered as part of SWS. This configuration page lives inside your PeopleSoft database. It is the job of the CHG_SWS_GET service operation to interpret the configuration, enforce security, run SQL and export the results to the client.
PeopleSoft Integration Broker distinguishes a Service from a Service Operation. SWS uses both:
CHG_SWS— the Service. This is the URL prefix that callers see (/PSIGW/RESTListeningConnector/PSFT_CS/CHG_SWS/your/path).CHG_SWS_GET— the Service Operation. This is the PeopleCode handler that actually runs when a request comes in. All admin-configured GET paths are dispatched through this one handler.
When the docs say “configure security on the service operation,” they mean CHG_SWS_GET. When you see “the CHG_SWS URL,” that is the Service prefix in the URL. (CHG_SWS_PSOFTQL, the advanced caller-driven service operation, is documented separately.)
This section discusses configuring this service in detail in this section as well as the security model and how to configure API client users.
- We assume that you understand REST and HTTP Concepts. If you do not, please read the What is HTTP and REST section.
- There is a more advanced service operation for a more narrow user base. You probably do NOT need that but you can read about it here..
Planning a new web service
Before configuring a new web service there are a few things to think through. We will cover them here at a high level and then go into detail in the subsequent sections. New web services are trivial to set up with SWS. However, without a little upfront thought, you can end up with some confusion for the users of your APIs.
URLs and Paths
In REST web services, the URL paths have an implied meaning and provide a hierarchy that should map to some logical structure of the underlying data it exposes. This paradigm is carried forward into SWS. The URL path is used to find the logic to run to export data over the web services. So you need to think through the URL path structure and how it will map to the SQL or PsoftQL statements you want to expose.
Thinking about the path hierarchy gives the API clients a good structure to reason about. When reading the paths from left to right, they start out broad and narrow down the request. A URL Path structure could be something like this:
{prefix}/person/{emplid}- This output information about a person and could possibly include some child data like phones, addresses, etc.
{prefix}/person/{emplid}/phone- This would output phones for a person. You might give this out to a team that needs to know phone numbers for a person and are not interested in other data or have security to see that other data.
{prefix}/person/{emplid}/address/- This would output addresses for a person.
{prefix}/person/{emplid}/address/{address_type}}- This would output a specific address type for a person.
{prefix}/security/users/{oprid}/- This would output general information on a specific OPRID.
{prefix}/security/users/{oprid}/roles/- This would output roles a user was a member of.
In those examples above, they are fairly generic paths. You can also have more specific paths that are more targeted to a specific use case. Let’s imagine that you have an integration with your SSO system. You need to expose some data that they need. Their requests do NOT seem to fit into any other categories that you have configured before. Perhaps those other SWS configurations expose too much data or sensitive data the SSO team should not see. They have very limited information and that team cannot use the generic paths above because the data is too broad. So you can create a more specific path for them. Let’s imagine that they need to know information about a person as well as to know if a person is active or not. You could create a path like this:
{prefix}/sso/person/{emplid}/- This may return general information about a person like name, email, etc.
{prefix}/sso/person/{emplid}/status- This may return a simple yes/no if the person is active or not.
In the case above, we “scoped” the SSO end points to the /sso/* path. If you had some other integration partners with very specific requirements then you could create a scoped path as well like /acmecorp/*. You can create as many paths as you need. You can also create paths that are not scoped to a specific integration partner. You can create paths that are scoped to a specific business process. For example, you could create a path for all the data needed for a specific business process like expense reports or invoices.
SWS is flexible. It provides no guidance on how to structure your paths. You can create as many paths as you need.
In SWS, the Path string is used to look up a configuration that ends up running some SQL and exporting the results to the client. So you need to think through the path structure and how it will map to the SQL or PsoftQL statements you want to run. You also configure security to these paths. As we will see shortly, a path maps to a specific SWS configuration row in the database. That configuration row has a security grid that allows you to specify what permission lists are allowed to run that configuration.
Syntax Types
There are two syntax types that SWS supports. When you configure a new web service you must choose one.
- SQL - You can configure a SQL statement to to run.
- PsoftQL - You can configure a PsoftQL statement to run.
When an HTTP client is calling a specific SWS path, the code in the web service handler looks up the configuration for that path. The configuration has a syntax type. The handler will use that syntax type to determine how to export data to the client. There are pros and cons to each syntax type. Here is a quick summary:
| SWS Configuration Types | SQL | PsoftQL |
|---|---|---|
| Accepts Client Parameters | Yes | Yes |
| Output JSON | Yes | Yes |
| Output XML | Yes | Yes |
| Output CSV | Yes | No |
| Nested Data parent/child data | No | Yes |
| Pagination | Yes (offset-based, via URL) | Yes (built-in, via request body) |
| Data Translation | Yes via SQL functions or Alias | No |
| Auto-Magic EFFDT Logic | None - Handled in SQL | EFFDT Logic automatically handled |
| Auto-Magic EFF_STATUS Logic | None - Handled in SQL | EFF_STATUS Logic automatically handled |
| Auto-Magic EFFSEQ Logic | None - Handled in SQL | EFFSEQ Logic automatically handled |
| Auto-Magic Field Exports | None - Handled in SQL | All record fields exported on table. No hard coding |
Security
Security - Security is very important with PeopleSoft data as the database holds sensitive information. SWS is based on the PeopleSoft REST services. The only viable authentication mechanism for REST based services is “Basic Authentication” which is tied to a PeopleSoft OPRID and password stored in PSOPRDEFN. There is a very thorough document on REST Security in our Integration broker book. That should be your reference on how REST authentication works and the best practices. We assume you have read it and are following the best practices.
There is more explanation of security in the Security Page
Data Access Models — CHG_SWS vs CHG_SWS_PSOFTQL
SWS ships two service operations, and they enforce data access in completely different ways. Knowing which model applies to a given endpoint determines what an administrator must do to grant or revoke access.
| Service operation | CHG_SWS_GET (this page) | CHG_SWS_PSOFTQL |
|---|---|---|
| Who chooses the SQL? | The PeopleSoft admin, in the SWS configuration row | The client, in the POST body |
| What gates access? | A permission-list grid on the configuration row | A whitelist table (C_SWS_REC_WL) keyed by permission list |
| Granularity | Per URL path | Per record name |
| Caller can request | Only the SQL the admin wrote at that path | Any record present in the whitelist for the caller’s permission list |
| Best for | Most third-party integrations | Trusted internal iPaaS platforms (MuleSoft, Snaplogic, Boomi) |
CHG_SWS (this page) — admin-defined paths. The admin writes the SQL or PsoftQL into a configuration row, attaches a list of permission lists allowed to call that path, and the caller GETs the URL. The caller cannot pick which record to read — the admin did that. Adding a record to the response means editing the SWS configuration. Granting a new partner access means adding their permission list to the configuration row’s permission-list grid.
CHG_SWS_PSOFTQL — caller-defined queries. The caller POSTs a PsoftQL body that names the records they want. Before running anything, the handler checks C_SWS_REC_WL to confirm every record in the request is whitelisted for the caller’s permission list. If any record is not whitelisted, the request is rejected with responseCode: 400 and the message “At least one record in your request is not whitelisted or is not a real record name.” — see Error Responses. Adding a record means inserting a row into C_SWS_REC_WL. Granting a new partner means giving their permission list whitelist entries for the records they need. The C_SWS_REC_WL table is described in the PsoftQL Web Service page.
The two models are independent. A given OPRID can have access to a curated set of CHG_SWS paths and a separate whitelist for CHG_SWS_PSOFTQL — those settings do not overlap. If you only ever expose data through CHG_SWS, the whitelist table doesn’t matter.
Configuring a New Web Service
Configuring a new web service in SWS is easy and fast. You can deploy a new SQL or PsoftQL statement as a new web service in a few minutes. We will walk through all the configuration sections in this section. In later sections, we will show how to create different web services in order to give you some ideas of how this can be used.
Here is a screenshot of the SWS configuration page for a simple person example. Let’s go through each configuration at a high level. Then in later sections, we will drill into the detailed functionality offered.
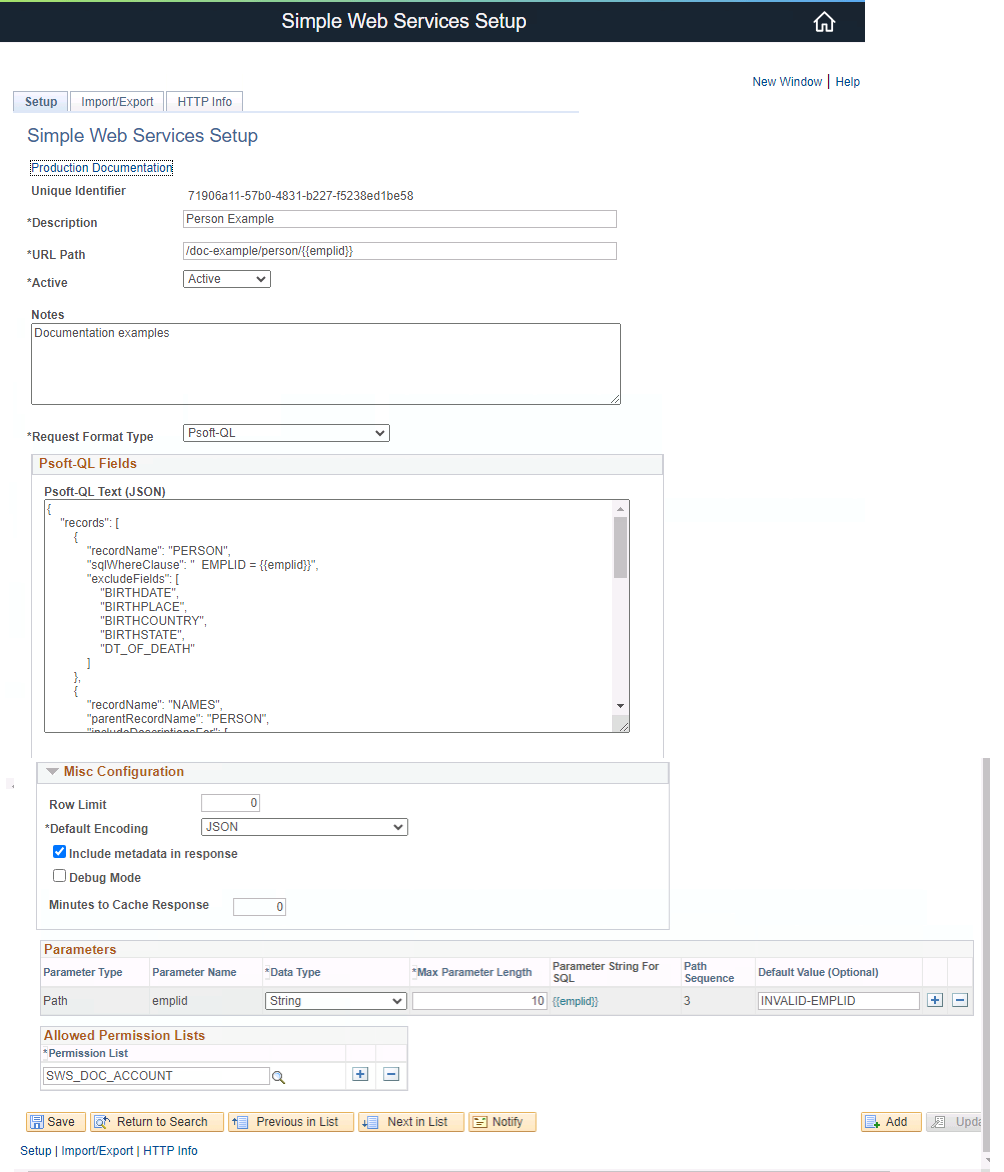
Example SWS Configuration
In the example above we have configured the following PsoftQL statement to run at this path: /doc-example/person/{{emplid}}
{
  "isDebugMode": true,
    "records": [
        {
            "recordName": "PERSON",
            "sqlWhereClause": "  EMPLID = {{emplid}}",
            "excludeFields": [
                "BIRTHDATE",
                "BIRTHPLACE",
                "BIRTHCOUNTRY",
                "BIRTHSTATE",
                "DT_OF_DEATH"
            ]
        },
        {
            "recordName": "NAMES",
            "parentRecordName": "PERSON",
            "includeDescriptionsFor": [
                "NAME_TYPE"
            ],
            "criteriaFields": [
                {
                    "fieldName": "NAME_TYPE",
                    "fieldValue": "PRI"
                }
            ]
        },
        {
            "recordName": "EMAIL_ADDRESSES",
            "parentRecordName": "PERSON",
            "includeDescriptionsFor": [
                "E_ADDR_TYPE"
            ]
        },
        {
            "recordName": "PERSONAL_PHONE",
            "parentRecordName": "PERSON",
            "includeDescriptionsFor": [
                "PHONE_TYPE"
            ]
        },
        {
            "recordName": "ADDRESSES",
            "parentRecordName": "PERSON",
            "includeDescriptionsFor": [
                "ADDRESS_TYPE"
            ]
        }
    ]
}
Let’s decode this configuration. We are configuring a PsoftQL statement to run. It is asking for this structure.
- PERSON
- NAMES
- EMAIL_ADDRESSES
- SWS will return all email address types since there are no filters
- PERSONAL_PHONE
- SWS will return all phone types since there are no filters
- ADDRESSES
- SWS will return all effective dated and active addresses since there are no filters. This is SWS auto-magic handling of effective dates and EFF_STATUS
- Additionally, we are asking that we exclude some fields from the PERSON record. We do not want to expose these fields to the client.
- BIRTHDATE
- BIRTHPLACE
- BIRTHCOUNTRY
- BIRTHSTATE
- DT_OF_DEATH
- We are also making this a single response for a single EMPLID. We have the
{{emplid}}variable in the path. That will be substituted into the PsoftQL statement at run time. - For NAMES, we are limiting it to only return the PRI name type.
- We are also asking for several description fields to be included in the output. This is a feature of PsoftQL.
- This SWS configuration is limited to a single permission list SWS_DOC_ACCOUNT, which is a service account we setup for this example.
We can then call this web service using an HTTP Request like this:
GET https://127.0.0.1:8000/PSIGW/RESTListeningConnector/PSFT_CS/CHG_SWS/doc-example/person/FA0003
accept: application/json
authorization: Basic U1dTX0RPQ19BQ0NPVU5UOkRJUkdFLXNwZWxsaW5nLWphZGUtdml0aWF0ZQ==
The response will look like this:
HTTP/1.1 200 OK
connection: close
content-encoding: gzip
content-length: 1271
content-type: application/json; encoding=UTF-8
date: Mon, 25 Sep 2023 19:00:34 GMT
x-oracle-dms-ecid: 786dc482-39b0-4314-8f25-9a91bc734fdb-0000002a
x-oracle-dms-rid: 0
x-peoplesoftrequestid: ce514ec3-5bd5-11ee-adcb-d5409ab5d8fe
x-success: True

{
  "data": {
    "PERSON": {
      "objectType": "record",
      "objectName": "PERSON",
      "fields": [
        {
          "rowNumber": 1,
          "EMPLID": "FA0003",
          "LAST_CHILD_UPDDTM": "",
          "NAMES": {
            "objectType": "record",
            "objectName": "NAMES",
            "fields": [
              {
                "EMPLID": "FA0003",
                "NAME_TYPE": "PRF",
                "EFFDT": "1998-07-09",
                "EFF_STATUS": "A",
                "COUNTRY_NM_FORMAT": "001",
                "NAME": "Abban,Ali",
                "NAME_INITIALS": "",
                "NAME_PREFIX": "",
                "NAME_SUFFIX": "",
                "NAME_ROYAL_PREFIX": "",
                "NAME_ROYAL_SUFFIX": "",
                "NAME_TITLE": "",
                "LAST_NAME_SRCH": "ABBAN",
                "FIRST_NAME_SRCH": "ALI",
                "LAST_NAME": "Abban",
                "FIRST_NAME": "Ali",
                "MIDDLE_NAME": "",
                "SECOND_LAST_NAME": "",
                "SECOND_LAST_SRCH": "",
                "NAME_AC": "",
                "PREF_FIRST_NAME": "",
                "PARTNER_LAST_NAME": "",
                "PARTNER_ROY_PREFIX": "",
                "LAST_NAME_PREF_NLD": "1",
                "NAME_DISPLAY": "Ali Abban",
                "NAME_FORMAL": "Ali Abban",
                "NAME_DISPLAY_SRCH": "ALIABBAN",
                "LASTUPDDTTM": "",
                "LASTUPDOPRID": ""
              },
              {
                "EMPLID": "FA0003",
                "NAME_TYPE": "PRI",
                "EFFDT": "1998-07-09",
                "EFF_STATUS": "A",
                "COUNTRY_NM_FORMAT": "001",
                "NAME": "Abban,Ali",
                "NAME_INITIALS": "",
                "NAME_PREFIX": "Ms",
                "NAME_SUFFIX": "",
                "NAME_ROYAL_PREFIX": "",
                "NAME_ROYAL_SUFFIX": "",
                "NAME_TITLE": "",
                "LAST_NAME_SRCH": "ABBAN",
                "FIRST_NAME_SRCH": "ALI",
                "LAST_NAME": "Abban",
                "FIRST_NAME": "Ali",
                "MIDDLE_NAME": "",
                "SECOND_LAST_NAME": "",
                "SECOND_LAST_SRCH": "",
                "NAME_AC": "",
                "PREF_FIRST_NAME": "",
                "PARTNER_LAST_NAME": "",
                "PARTNER_ROY_PREFIX": "",
                "LAST_NAME_PREF_NLD": "1",
                "NAME_DISPLAY": "Ali Abban",
                "NAME_FORMAL": "Ms Ali Abban",
                "NAME_DISPLAY_SRCH": "ALIABBAN",
                "LASTUPDDTTM": "",
                "LASTUPDOPRID": ""
              }
            ]
          },
          "EMAIL_ADDRESSES": {
            "objectType": "record",
            "objectName": "EMAIL_ADDRESSES",
            "fields": []
          },
          "PERSONAL_PHONE": {
            "objectType": "record",
            "objectName": "PERSONAL_PHONE",
            "fields": [
              {
                "EMPLID": "FA0003",
                "PHONE_TYPE": "MAIN",
                "COUNTRY_CODE": "",
                "PHONE": "",
                "EXTENSION": "",
                "PREF_PHONE_FLAG": "Y"
              }
            ]
          },
          "ADDRESSES": {
            "objectType": "record",
            "objectName": "ADDRESSES",
            "fields": [
              {
                "EMPLID": "FA0003",
                "ADDRESS_TYPE": "PERM",
                "EFFDT": "1998-01-14",
                "EFF_STATUS": "A",
                "COUNTRY": "USA",
                "ADDRESS1": "10299 Placid Place",
                "ADDRESS2": "",
                "ADDRESS3": "",
                "ADDRESS4": "",
                "CITY": "New Market",
                "NUM1": "",
                "NUM2": "",
                "HOUSE_TYPE": "",
                "ADDR_FIELD1": "",
                "ADDR_FIELD2": "",
                "ADDR_FIELD3": "",
                "COUNTY": "",
                "STATE": "MD",
                "POSTAL": "21774",
                "GEO_CODE": "",
                "IN_CITY_LIMIT": "",
                "ADDRESS1_AC": "",
                "ADDRESS2_AC": "",
                "ADDRESS3_AC": "",
                "CITY_AC": "",
                "REG_REGION": "",
                "LASTUPDDTTM": "",
                "LASTUPDOPRID": ""
              }
            ]
          }
        }
      ]
    }
  },
  "errorMessages": "",
  "errors": "",
  "meta": {
    "rowCount": "1",
    "sqlIDExecuted": "71906a11-57b0-4831-b227-f5238ed1be58",
    "success": "True",
    "debugMessages": "",
    "QueryString": "NULL",
    "URLPath": "doc-example/person/FA0003",
    "finalSQL": "{\n    \"records\": [\n        {\n            \"recordName\": \"PERSON\",\n            \"sqlWhereClause\": \"  EMPLID = 'FA0003'\",\n            \"excludeFields\": [\"BIRTHDATE\",\"BIRTHPLACE\", \"BIRTHCOUNTRY\", \"BIRTHSTATE\", \"DT_OF_DEATH\"]\n        },\n        {\n            \"recordName\": \"NAMES\",\n            \"parentRecordName\": \"PERSON\"\n        },\n        {\n            \"recordName\": \"EMAIL_ADDRESSES\",\n            \"parentRecordName\": \"PERSON\"\n        },\n        {\n            \"recordName\": \"PERSONAL_PHONE\",\n            \"parentRecordName\": \"PERSON\"\n        },\n        {\n            \"recordName\": \"ADDRESSES\",\n            \"parentRecordName\": \"PERSON\"\n        }\n    ]\n}",
    "productVersion": "2023-06-07",
    "toolsVer": "8.58.07",
    "currentUser": "SWS_DOC_ACCOUNT",
    "responseDTTM": "2023-09-25 19:00:34.000000",
    "psftTransactionId": "ce514ec3-5bd5-11ee-adcb-d5409ab5d8fe",
    "dbname": "CS92U020",
    "dbType": "ORACLE",
    "serverTimeZone": "PST",
    "ServerDirectory": "C:\\Users\\psoft\\psft\\pt\\8.58\\appserv\\APPDOM",
    "debugMessage": ""
  }
}
Configuration Options
Let’s cover each field on the SWS configuration page.
- Unique Identifier: This is a system generated GUID that will be generated at save time. It is used to uniquely identify this configuration. You can not change this value and it should be safe to export to another database unlike a integer counter.
- Description: This is the description of the configuration. This is for admin use and is used in PeopleSoft search records.
- URL Path: This field is very important and will map to the full URL that a client will use to target your web service. This has to be unique across the database.
- Active: Allows you to easily turn on or off the configuration.
- Notes: This is a section for you to add notes about this web service. This might be internal notes or links to documentation or development tickets.
- Request Format Type: PSOFT-QL or SQL - This defines what syntax SWS uses to query and return data.
- If “Psoft-QL request format type was chosen then a long text box will show up called. Psoft-QL Text (JSON)
- You enter the Psoft-QL that you want to run in response to a client request. This has a very particular format.
- If “SQL” request format type was chosen then a long text box will show up called. SQL Statement Text
- You enter the SQL that you want to run in response to a client request.
- SQL Statement Text: This is the section where you enter the SQL statement that will run.
- There is some special syntax for binding variables from the client request to the SQL statement. We will cover that detail in the next section.
- If “Psoft-QL request format type was chosen then a long text box will show up called. Psoft-QL Text (JSON)
- Row Limit: Optional row limit. You can specify a non-zero number here and the handler will stop the output after that number of output rows has been encoded. Clients can override this at runtime by passing
?rowLimit=Non the URL, which also serves as the page size when the client paginates with?pageNumber=N. See Pagination for SQL endpoints below. - Default Encoding: Used to set a default encoding scheme if the client does not include one in the request. All SWS web services automatically handle
JSON,CSVandXMLencoding. - Include metadata in Response: If checked then some additional information about the SWS request and response will be encoded. We will show some examples of this shortly.
- (danger) Minutes to Cache Response: You can optionally configure to have the integration broker cache the response. This can be done for performance reasons if the SQL is very “expensive”. Please read the Caching article before enabling this. There are some hidden dangers.
- Parameters Grid: This grid allows you to configure how the client passes parameters that are substituted into the SQL. If your SQL does not have any variables provided by the client, there will be no rows here. We will cover this in depth shortly.
- Output Fields Grid: This will only show for a “SQL” Request Format Type. This grid is where you name the SQL columns that show up in the encoding section. For JSON and XML encoding, the values here will be the names of the properties and nodes. For CSV, these will be the header values.
- Allowed Permission Lists Grid: This grid is where you configure SWS to tell what permission lists are authorized to run this SQL statement. There is a detailed security section below that documents how to use this and setup API client users.
- Copy & Delete - Inside this group box are buttons to clone/copy the current configuration or to delete it.
- DMS Export - Inside this group box is a generated DMS script template that can be used to export your configuration between databases.
- HTTP Info Page - This page gives you both HTTP and curl examples on how to invoke the service operation. This removes the guesswork and speeds up the testing cycle.
The Parameters Grid
The Parameters Grid binds values from the inbound HTTP request to placeholders in your SQL or PsoftQL. Each row in the grid declares one parameter that the SWS handler will accept and substitute at run time. If your SQL has no :name bind variables (or your PsoftQL has no {{name}} placeholders), this grid stays empty and the handler simply runs the statement as-is.
Anatomy of a Parameters Grid row
Each row carries the fields below. The exact column labels match the labels on the PeopleSoft setup page.
| Column | What to enter |
|---|---|
| Parameter Name | The name you will reference in the statement. For SQL, write :paramName in the SQL Statement Text. For PsoftQL, write {{paramName}} inside sqlWhereClause or a path segment. |
| Source | Where the value comes from. The two supported sources are URL Path Segment and Query String. URL Path Segment is for {paramName} tokens in the URL Path field; Query String is for ?paramName=value on the request URL. |
| Required | If checked and the parameter is absent at request time, the handler short-circuits and returns an error without running your SQL. Leave unchecked for optional filters whose defaults are handled inside the SQL. |
| Default Value | Optional. Used when the parameter is not supplied and Required is unchecked. Skip when the SQL itself handles the default (e.g. WHERE EFFDT <= COALESCE(:asof, %CURRENTDATEIN)). |
| Data Type / Length | Informational on the grid; the handler does not coerce types. The bind happens as a string and your SQL’s column type drives any implicit conversion. Use this column as documentation for whoever maintains the configuration. |
Wiring a URL path parameter — step by step
Goal: serve GET /acmecorp/people/{emplid} and substitute {emplid} into the SQL.
On the URL Path field, enter
acmecorp/people/{emplid}. The braces are literal — they tell SWS to capture whatever segment appears in that position at request time.In the SQL Statement Text, reference the value as
:emplid:SELECT A.EMPLID, A.NAME FROM %TABLE(PERSON_NAME) A WHERE A.EMPLID = :emplidAdd one row to the Parameters Grid:
Parameter Name Source Required Default Value emplidURL Path Segment yes (blank) Save. At request time,
GET .../acmecorp/people/KU0001runs the SQL with:emplidbound to'KU0001'. The actual SQL executed appears in the response’smeta.finalSQL— useful for verifying the substitution worked.
Wiring a query-string parameter
Goal: optional ?activeOnly=Y filter on the same endpoint.
Extend the SQL:
SELECT A.EMPLID, A.NAME, A.ACCTLOCK
  FROM %TABLE(PSOPRDEFN) A
 WHERE (:activeOnly = 'N' OR A.ACCTLOCK = 0)
Add a Parameters Grid row:
Parameter Name Source Required Default Value activeOnlyQuery String no NGET .../usersreturns everyone (default'N');GET .../users?activeOnly=Yfilters to non-locked accounts. The response’smeta.QueryStringechoes back the literal query string the client supplied, which is handy for confirming the value was actually received.
Parameter binding gotchas
- SQL bind variables are strings on the wire. If you need numeric semantics in the SQL, cast explicitly:
WHERE A.PERSON_NUM = TO_NUMBER(:personNum)on Oracle. - Names are case-sensitive in PsoftQL
{{...}}substitution but match by position in SQL:namebinding. Pick a consistent convention (lowerCamelCase is common) and stick with it. - Path-segment names must match between the URL Path field and the grid. A typo in either silently treats the parameter as absent.
- Never concatenate parameter values into the SQL string yourself. Always use
:namebinds — SWS handles SQL injection prevention only when you use the binding path.
The Output Fields Grid
The Output Fields Grid lives only on SQL configurations. It maps each SQL column position to the field name that appears in the response. The grid serves three encoders from one source of truth:
- JSON — the grid value becomes the property name in each row object
- XML — the grid value becomes the element tag inside each
<row> - CSV — the grid value becomes the column header in the first row
Filling out the grid
The grid has one row per SELECT column, in the same order as the SQL. If your SQL is:
SELECT A.EMPLID, A.NAME, A.EMAIL_ADDR
  FROM %TABLE(PERSON) A
 WHERE A.EMPLID = :emplid
then the grid has three rows:
| Column Number | Output Field Name |
|---|---|
| 1 | employeeId |
| 2 | fullName |
| 3 | emailAddress |
The number column auto-increments — what you control is the Output Field Name for each position. Names can be anything the encoders accept; lowerCamelCase or snake_case both work, but pick one and stay consistent across your endpoints.
What happens if I skip a row?
If the grid has fewer rows than the SQL has columns, the missing columns fall through to the original PeopleSoft field name in upper case (EMPLID, NAME, etc.). If the grid has more rows than the SQL has columns, the extras are ignored. Avoid both — match the row count exactly so the configuration documents the contract clearly.
Re-ordering columns
Re-ordering the grid does not re-order the response. The position number is what binds a grid row to a SELECT column. To change column order in the response, change the SELECT list in the SQL and renumber the grid to match.
Why no Output Fields Grid for PsoftQL?
PsoftQL responses are nested PeopleSoft records, not flat rowsets. The property names come straight from the record’s field names — there is nothing to alias. If you need different output field names from a PsoftQL response, transform the response in your client or switch the configuration to SQL.
Worked Example — SQL Configuration with a Path Parameter
The configuration walkthrough above used a PsoftQL example. This section shows the same idea using SQL — useful when you want CSV output, SQL functions, or a hand-tuned WHERE clause. The endpoint demonstrated here is deployed on our public demo system; you can reproduce the same configuration in your own database.
The configuration
| Field | Value |
|---|---|
| URL Path | test/sql/security/users/{oprid} |
| Request Format Type | SQL |
| SQL Statement Text | SELECT A.OPRID, A.ACCTLOCK FROM %TABLE(PSOPRDEFN) A WHERE OPRID = :oprid |
| Parameters Grid | One row: name oprid, source = URL path segment |
| Output Fields Grid | OPRID → oprid, ACCTLOCK → locked |
| Default Encoding | JSON |
| Include metadata | Checked |
| Allowed Permission List | (whichever permission list represents your API client; the demo uses CHG_PSOFTLENS_API_USER) |
Three notes on the SQL above:
%TABLE(PSOPRDEFN)is a PeopleSoft meta-SQL macro that resolves to the actual physical table name (PSOPRDEFN) at run time. Using it lets your configuration survive renames between releases.:opridis the SQL-bind form of the path parameter. SWS routes the value the client supplied in the{oprid}URL segment into the bind variable. SWS handles parameter substitution safely; do not concatenate request values directly into the SQL string.- The Output Fields Grid renames
OPRIDtoopridandACCTLOCKtolockedso the response uses lower-case, vendor-friendly names rather than the underlying record’s all-caps PeopleSoft field names.
The HTTP call
GET http://your-ib-host/PSIGW/RESTListeningConnector/PSFT_CS/CHG_SWS/test/sql/security/users/PS
Authorization: Basic ...redacted...
Accept: application/json
JSON response
HTTP/1.1 200 OK
content-type: application/json; encoding=UTF-8

{
  "data": [
    {
      "oprid": "PS",
      "locked": "0"
    }
  ],
  "errors": "",
  "meta": {
    "rowCount": "1",
    "sqlIDExecuted": "2d43c8aa-40b2-4c39-9b2a-4a115804c685",
    "success": "True",
    "pageNumber": "1",
    "rowLimit": "9999999",
    "URLPath": "test/sql/security/users/PS",
    "finalSQL": "SELECT A.OPRID, A.ACCTLOCK FROM %TABLE(PSOPRDEFN) A WHERE OPRID = 'PS'",
    "productVersion": "2026-04-20",
    "toolsVer": "8.61.03",
    "currentUser": "CHG_PSOFTLENS_API_USER",
    "dbname": "CS92DEV",
    "dbType": "ORACLE"
  }
}
The two interesting fields in meta:
finalSQLshows the SQL after parameter substitution —WHERE OPRID = 'PS'. Use this when debugging “why didn’t I get the rows I expected?”: you can copyfinalSQLstraight into a SQL client and run it yourself.sqlIDExecutedis a per-execution GUID that links the response back to log entries inC_SWS_RUN_LOGfor audit and troubleshooting.
Same endpoint, CSV encoding
Change the Accept header and SWS swaps the encoder. The response body becomes a CSV document and the metadata moves into x-* HTTP response headers (CSV has no place for a nested meta block):
GET http://your-ib-host/PSIGW/RESTListeningConnector/PSFT_CS/CHG_SWS/test/sql/security/users/PS
Authorization: Basic ...redacted...
Accept: text/csv

HTTP/1.1 200 OK
Content-Type: text/csv; encoding=UTF-8
x-rowCount: 1
x-pageNumber: 1
x-URLPath: test/sql/security/users/PS
x-sqlIDExecuted: 2d43c8aa-40b2-4c39-9b2a-4a115804c685
x-success: True

"oprid","locked"
"PS","0"
The header row uses the names from the Output Fields Grid (oprid, locked), confirming that the same grid feeds JSON property names, XML element names, and CSV header names from a single source of truth.
Pagination over a SQL endpoint
The exact same configuration paginates automatically if the client adds query-string parameters — no setup change required. See Pagination for SQL endpoints below for the full parameter list. Quick example, page 2 with 3 rows per page against test/sql/allusers:
GET .../CHG_SWS/test/sql/allusers?pageNumber=2&rowLimit=3
Accept: application/json

{
  "data": [
    { "oprid": "ASHUE",  "emplid": "" },
    { "oprid": "AZIGLAR","emplid": "" },
    { "oprid": "BDAVIS", "emplid": "" }
  ],
  "errors": "",
  "meta": {
    "rowCount": "3",
    "pageNumber": "2",
    "rowLimit": "3",
    "QueryString": "pageNumber=2&rowLimit=3",
    "finalSQL": "select oprid, emplid from psoprdefn"
  }
}
Notice that finalSQL is the original SQL — pagination is layered on top by the handler, not by rewriting the statement. The client controls page size and offset; the admin controls what SQL runs and what rows it can see.
SQL Response Metadata
Every SQL-type response (JSON or XML) carries a meta block; CSV responses surface the same values as x-* HTTP headers. The PsoftQL response page has a companion reference covering the fields shared between SQL and PsoftQL responses (toolsVer, dbname, psftTransactionId, etc.). The table below covers the SQL-specific fields you only see on CHG_SWS_GET responses.
| Property | Type | Use |
|---|---|---|
finalSQL | string | The SQL that ran, after parameter substitution. Copy/paste this into a SQL client to reproduce the result by hand. Indispensable for debugging “why didn’t I get the rows I expected?”. |
sqlIDExecuted | string | Per-execution GUID. Links the response back to the audit row written to C_SWS_RUN_LOG and to any application-server log entries that mention it. |
rowCount | string | Number of rows in the response after any rowLimit cap. Quoted as a string — older PeopleTools quirk; parse to integer in your client. |
URLPath | string | Path segment that resolved to this configuration row (e.g. "test/sql/security/users/PS"). Useful when one OPRID has access to many similar paths and you want to confirm which one served the response. |
QueryString | string | Raw query string from the request (or the literal "NULL" when no query string was supplied). |
pageNumber | string | Page index the client requested. Quoted as a string for the same reason as rowCount. |
rowLimit | string | Effective page size — the lower of the client’s ?rowLimit=N and the configuration’s row limit. |
success | string | "True" or "False". Redundant with HTTP status but the only success indicator inside the CSV x-* headers. |
debugMessage | string | Handler debug trace when the configuration is in debug mode. Empty otherwise. Note the singular spelling — distinct from PsoftQL’s plural debugMessages. |
For CSV responses the same fields are emitted as response headers with an x- prefix: x-finalSQL, x-sqlIDExecuted, x-rowCount, x-URLPath, etc. The HTTP header field names preserve the original camelCase, which is unusual but matches what callers see on the wire.
A few specific tips:
- Treat
metaas informational, not a contract. Field set varies by PeopleTools version. Newer builds emitproductVersion; older ones emitapiVersion. Code defensively. - Don’t log
finalSQLto public sinks. It can contain values from path parameters and query strings — including ones a caller might consider sensitive (EMPLID, OPRID, etc.). Treat it like a SQL trace. psftTransactionIdis your support handle. Anything you can’t reproduce — capture this GUID and PeopleSoft support can correlate it across app-server logs, IB monitor, and the SWS run log.
Pagination for SQL endpoints
Pagination governs response size, not query cost. For ledger, journal-line, or other tables with millions of rows, combine pagination with a selective WHERE clause. See the FAQ entry Can SWS handle millions of rows? for the recommended approach.
Any SQL-type SWS configuration can be paginated by the client with two optional URL query-string parameters. No configuration change is required on the SWS setup page — the parameters are applied automatically by the SWS handler when present.
| Query parameter | Type | Default | Meaning |
|---|---|---|---|
rowLimit | integer | Setup-configured Row Limit value | The maximum number of rows returned on a single page. |
pageNumber | integer | 1 | 1-based page index. Page 1 returns rows 1–rowLimit, page 2 returns the next rowLimit rows, and so on. |
Pagination is offset-based. The handler fetches the full result set from the database and skips the rows that belong to earlier pages before it encodes the response. This means every paginated call still pays the cost of the underlying query, so pagination is not a substitute for an efficient WHERE clause when working with very large tables.
Example
Fetch the third page of 20 users from a SQL-backed /sql/allusers configuration:
GET /PSIGW/RESTListeningConnector/PSFT_CS/CHG_SWS/sql/allusers?pageNumber=3&rowLimit=20
Accept: application/json
Authorization: Basic <token>
The response payload includes three additional meta fields so the client knows where it is in the result set:
{
  "data": [ /* ... 20 rows ... */ ],
  "errors": "",
  "meta": {
    "rowCount": "20",
    "pageNumber": "3",
    "rowLimit": "20",
    "nextPageNumber": "4",
    "success": "True"
  }
}
pageNumberandrowLimitecho the effective values used for this request.nextPageNumberis present only when at least one more row remains after the current page. Its absence signals the last page.- For XML responses the same three fields appear under
/response/meta/. For CSV responses they are emitted as the HTTP response headersx-pageNumber,x-rowLimit, andx-nextPageNumber(matching the existingx-rowCount,x-success, and otherx-*headers used by CSV clients).
Backward compatibility
If a client sends neither pageNumber nor rowLimit, the SQL endpoint behaves exactly as it did before pagination was added: results are capped only by the setup-configured Row Limit field on the configuration row. Existing integrations do not need to change.
Ordering
Pagination relies on the natural ordering of the configured SQL statement. If the SQL does not include an ORDER BY clause, the database is free to return rows in any order, and that order can shift between calls — paging may then skip or duplicate rows. When you design a SQL configuration that clients will page through, add an explicit ORDER BY on a stable key.